So the camper was worse off then we thought. The slide wasn't just not working, it was pulling off the wall. The wall that was soaked with and rotted by water. Along with the floor on the back third of the camper. And pulling up the linoleum revealed a black spongy floor that stunk of rot. It smelled so bad it's crazy to believe we couldn't tell because it was obviously that way for quite a while. [Uh, I could totally smell it, but I thought it was stinky feet. In retrospect, it doesn't really make sense that the stinky feet smell would seemingly *poof* into existence when somebody flopped onto the banquet directly over said black rot of death.] So Becky and I had a passionate debate about the state of the camper and what to do next. I wanted to repair it and she called it a lost cause and not worth our time. [To be fair I was pro-fix for like a day, then I started tearing things out.] I was determined to give it a try and said I'd have it fixed up by the end of fall. Oh I remember that guy, so stupid and full of hope and confidence. [That guy was so irritating. "I'll have it done for fall camping."] That confidence you only have when you really don't know what you're getting yourself into. I mean how hard can it be, and isn't it weird that I can't find anything about people making these types of repairs on these glued together campers. [Weird indeed...]
First step was tearing out the floor and wall until we hit good wood. Well first, it was stripping the camper down and removing everything we could around the area that needed fixing. So the dinette, the couch, the entire kitchen. [Ahem, I tore out the couch, banquet, and all supporting pieces while under the broken slide. Face to face with the stink, barely able to move.] Then the whole bottom section of the back wall had to come out and a strip of one wall side where it was had soaked up the wall. I tore out the wall sections to the outside fiberglass. The floor was soaked in a U shaped pattern so tore that out until hitting floor that didn't have water marks. Where it was wet it came out fairly easy but to even out the U we had to take the middle section out that wasn't wet, that was very difficult to cut and break out. Overall using one of those vibrating saws, a putty knife, and a crowbar while working in small sections did the trick. The slide motor and cables attach to the back wall so that had to come down too with the thought that they could just go right back up. [So much optimism.]
So the whole time I'm tearing this down the thought is still in the back of my mind... how is this going to work, will it be structurally sound, how does that stupid slide even work. But these were all future problems and I was sure we'd be much smarter by the time we had to address them.
Pulled up the linoleum and shocked at what we found
Becky's exploratory demolition to see what we were dealing with
Took the floor out to the aluminum, thought there might be more support but was only foam sandwiched between 1/4 inch plywood.
We had taken out the dinette and the couch right away to get under the linoleum, but once we decieded to try saving the camper the stove, sink, and cabinets were moved to the garage.
What's reamaining is the water proof membraine at the bottom of the
camper we left it but it had some standing water in it so poked a few
holes at the corners to drain it out. Water was soaking up the wall on one side so we took up a few inches out
to the outer shell of the camper a thin layer of the old plywood had to
be left to avoid damaging the fiberglass.
Back wall was the completely soak so bottom section had to be removed up to the rear slide.
Zoomed out view
Then kept working back, not to good wood yet on the sides but the middle you can see where the water stopped. The dry part in the middle was tough to get out since the wood was solid. The bottom that looks wet was still wet and the bottom wood layer was just mush. Had to put fans on it all for a few days to get it dried out.
And kept working back. It was getting harder to find a place to stand since there wasn't a floor. So was using make shift scaffolding I don't show it but I wrote NO STEP on the waterproof membane to remind myself and the kids that there isn't really a floor there.
I had to remove the heater since the damage went under it. That's pretty much as far as it went on each side once it got to the trailer wheel well it stopped. Or most likely drained out there.
Zoomed out view of floor removed.
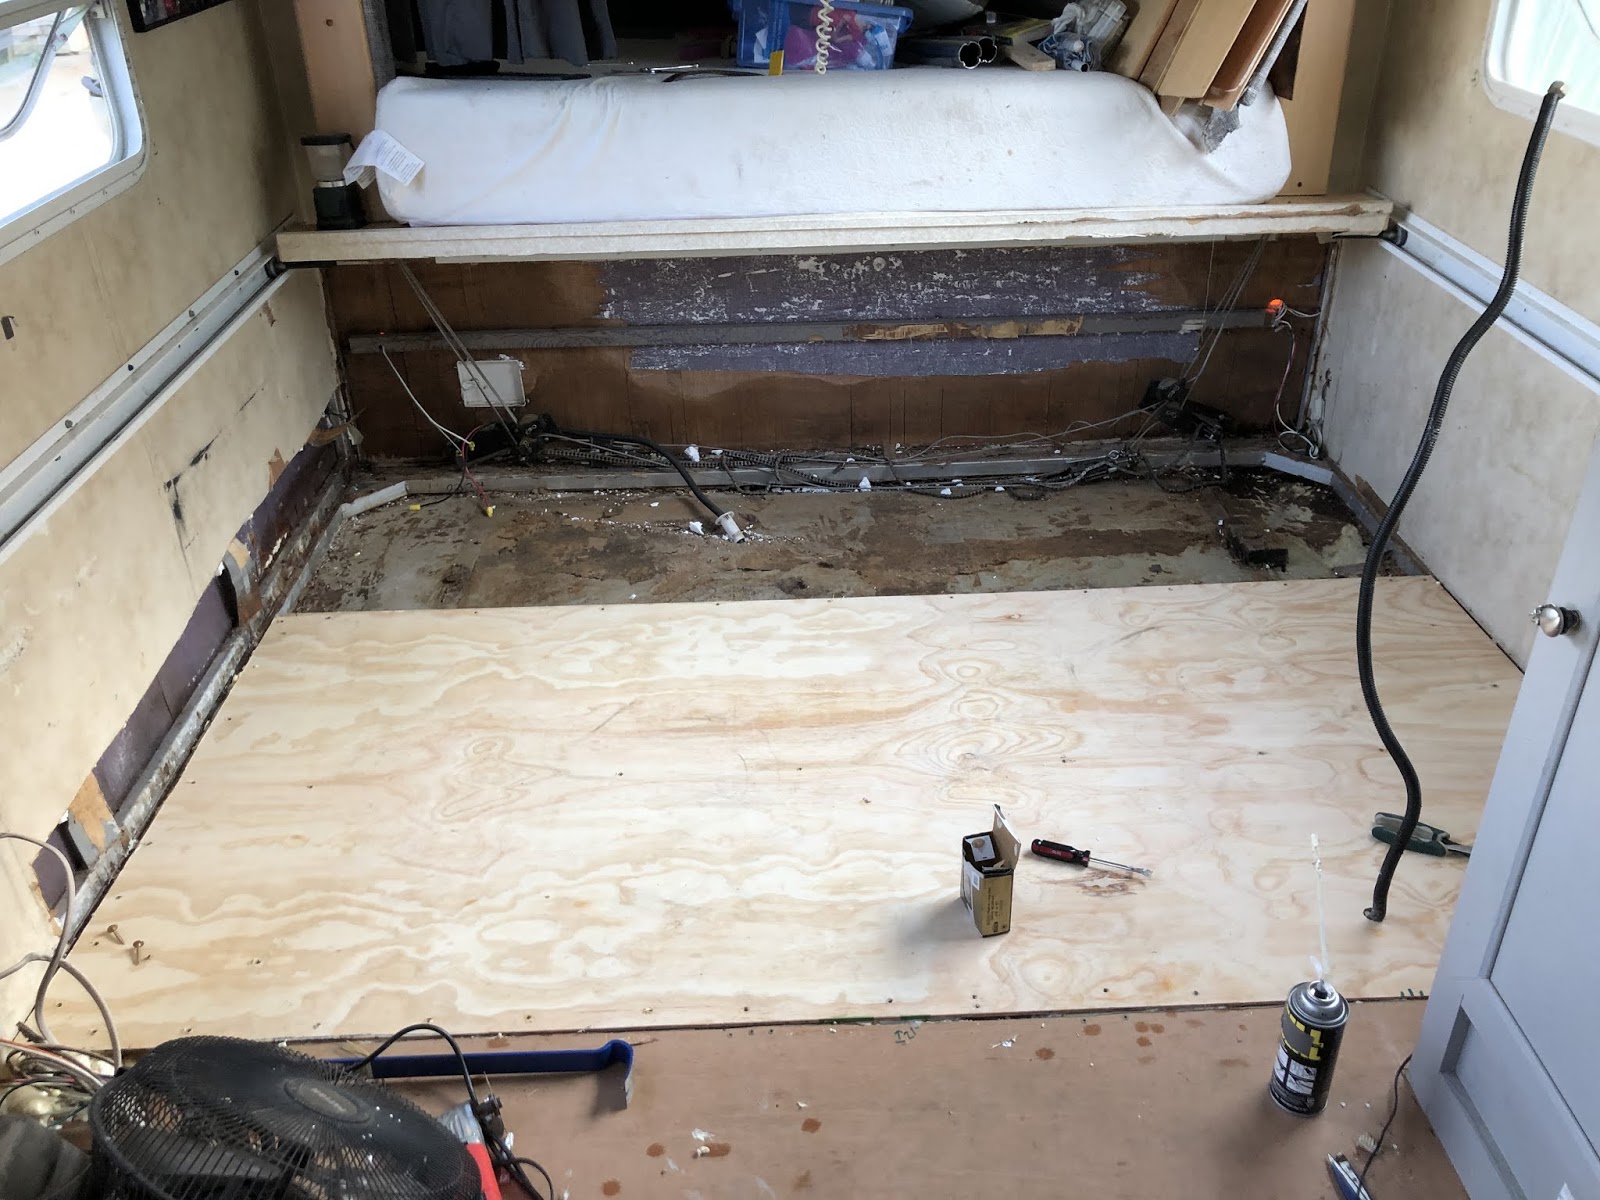
Now time to put it back together. I used cedar 2x2's to create a frame and here I put a 2x4 in the middle for a little more support and that's where the dinette table stands will connect so wanted something solid to attach them to. The whtie is 1/4 inch waterproof wall panel, I used that instead of plywood because the waterproof membrane was damaged in a few spots. In hindsight it might not be the best move, left over panel in my garage that I've moved around a few times seems really fragile so worried it might break up but might be fine we'll see I guess. The whole thing just sites on the two arms of the trailer and then I had to jack up the walls so it would match up again and then glued and used lag screws to secure the 2x2's to the aluminum old floor frame.
After the bottom frame was in place I glued pink foam board down to the bottom and then used a layer of 1/4" plywood on the top. Lots of construction adhesive and screwed it down the the wooden frame.
Looked pretty good
But when I walked on it flexed quite a bit. Just couldn't get it pressed together like they do in the factory.
Finished out the rest of the floor the same way, this was smaller section and I used a 2x6 instead of a 2x4 in the middle. The reason for that was that was where the elevator bolts that attached the floor to the trailer frame came through and I wanted something really solid holding it on.
Here I got a shot of the foam before closing it up.
Got it covered up and that smaller section didn't flex as much but I was hoping it would help the other section since they were now attached 2x2 to 2x2 but it didn't really help at all. Super springy.
We decided that the floor as it was wouldn't do so needed to find a solution. I ended up putting a overlay layer of 1/2 plywood over the floor I just built. Glued and screwed that down and it now the floor is rock solid. But we now have a 1/2 inch transition to the existing floor in the rest of the camper (future problem). This picture is before the overly, below in the back wall picture you can see the overlay is done but doesn't look all that different just moved the seam of the plywood.
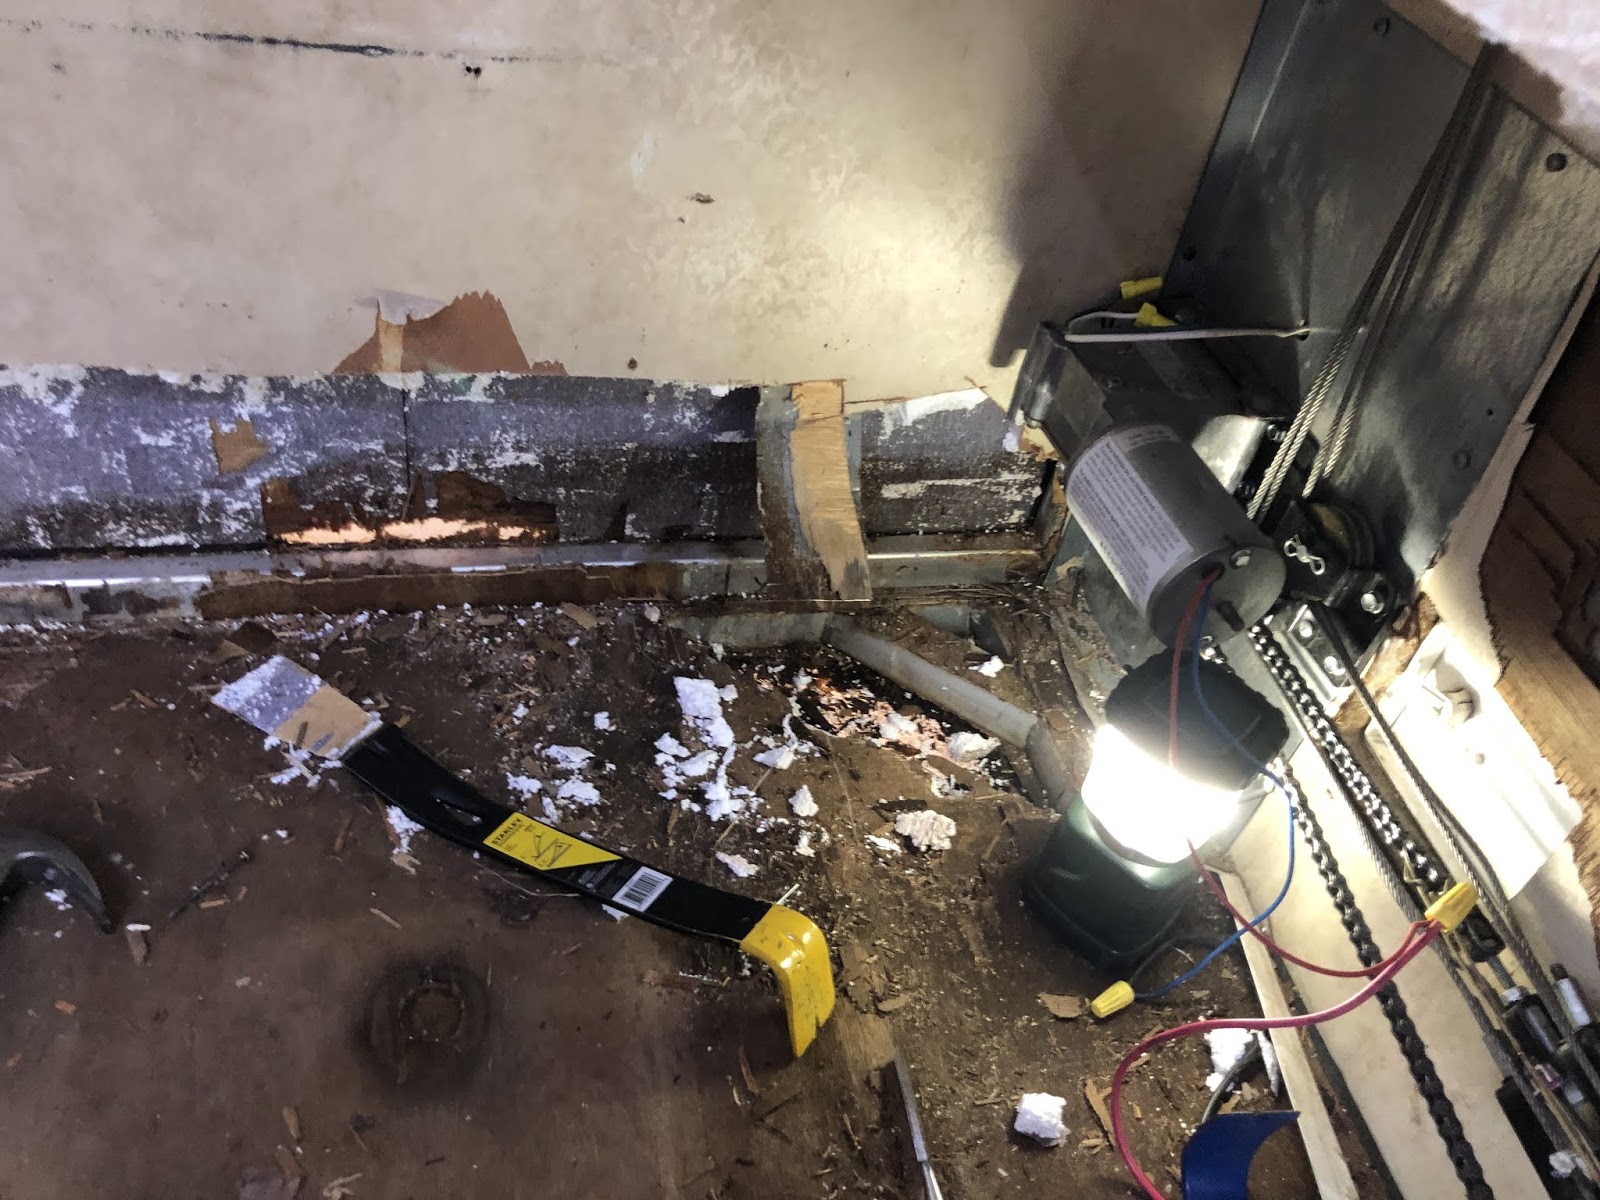
Now the back wall, used 1x10 cedar boards glued to the back wall and aluminum frame on the sides, no mechanical fasteners except for the slide braces when they get put up.
Threw up the slide brackets just as I had taken them down but with new screws
Other side that has the slide motor. The slide was the most stressful part of the build. I put it up just as it came down and fixed the chain we had disconnected. Looked good but made a horrible sound trying to operate it. The whole system is pretty confusing and after spending hours trying to understand it I decided time for a professional. I called around and none of the RV places made house calls but they gave me a couple of names. I called but never got a response. It was almost winter so they probably had closed up shop for the year already. So after a couple week break I went at it again with fresh eyes and slowly figured out how it worked and made the adjustments needed to get it moving without the horrible sound. The chain was too loose and was getting wrapped around the sprocket. After that getting the tension on all the wires correct took a ton of time and a lot of adjustments. But finally I got it to good enough and everything looked ok with proper tension so I called it a job done. I'm sure a professional would have done it in minutes but at least it was working and the biggest hurdle of the rebuild was behind me.
More shots of the back wall and slide. Doesn't it look good!
I don't think it's ever been this straight
Super straight, it probably needs more frequent adjustments which I should be able to do now. Becky and I took it for a test drive after the slide was done, we drove it around town and drove on I-90 for quite a while and everything went good and was still together after the drive so hopes are sky high that this build will be a success.
Here's a good shot of the overlay, at first we were going to transition the 1/2 between floors but finally decided to overlay the entire camper living space with 1/2 inch of plywood to match it back up. I had added a couple 100 pounds to the back of the camper so I figured beyond matching the floor up I'd offset a lot of the extra weight in the back hopefully balancing it all out better. There's still some fear that it might not pull right. We have over 6,000 miles planned for for this years trip so it better.
I got the overlay done in the boys bunk house it was a square and pretty simple. Then I cut out the bathroom but didn't get it attached yet.
I cut out all the rest of the jigsaw puzzle but didn't get them down. Winter was in full swing.
My workshop outside the garage, getting the last of the puzzle pieces cut out
Pretty much snowed out, I called it quits for the season as I was dragging quite a bit of snow in the camper and the whole idea here is to keep water out.
Marc and his snowman.
So that's where we're at, from the black mold video that shows us days after the 2019 trip to winter and now the 2020 trip breathing down our necks. Less than 100 days from our next adventure and we really have to kick it in. We'll need time for quite a bit of practice camping this year to make sure she holds together (I give it a 40% chance of us buying a camper in Arizona or California half way through this years trip) but first we need to get the rest of the overlay glued down, new flooring in, and everything reinstalled. Not to mention I need to refinish the roof, install fenders, grease the bearings, and any other general maintenance we run into.
I'm actually super excited and can't wait to get practice camping, we didn't get any fall camping in last year so spring can't come soon enough. I'm happy that we gave this rebuild a chance and while it's just a camper and a means to a end, the paper house has been a big part of our family and to see it up and going again even if it's just another year or two is going to be awesome!
Next post should be a tour of it all together, wish us luck. And did anyone notice that we had just done a big remodel of the inside at the beginning of last year after waiting on it for 5 years... I find the timing of all this pretty funny.